
Table of contents:
- See you at Do-it 2024 (see also https://www.westernpyro.org/events/do-it/)
- My 4th of July - an Operator’s Experience by Dennis Miele, WPA Secretary
- Wild West of pyro & other goods at the Czech Border
- 'Pyro Dream Team' Roundtable Discussion Part II with Eric Tucker, Martin Heidelberg, Pyro Pete Cappodocio, Patrice Guy, and moderated by Peter Rogoz
- Eric Krug & Jim Widmann's Analysis of the Successful Launch of the Guinness World-Record 1.575m (62-inch; weighing 1,268 kg) Firework Shell, with "comparison to external and internal ballistics study"
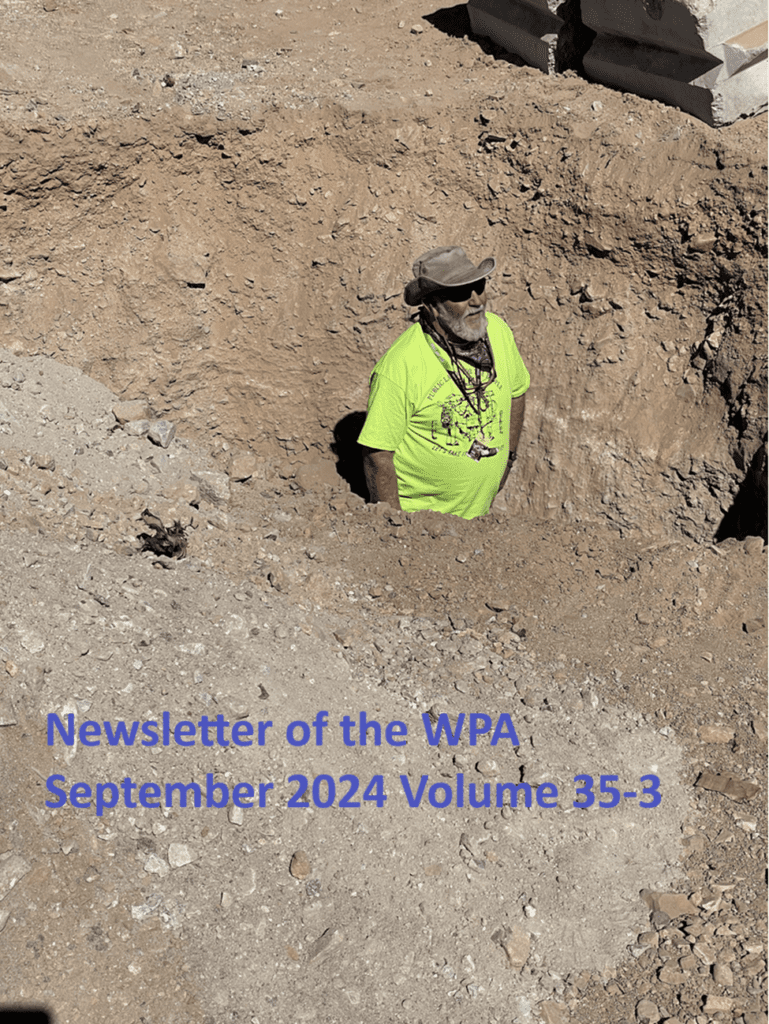
See you at 'Do-it' 2024
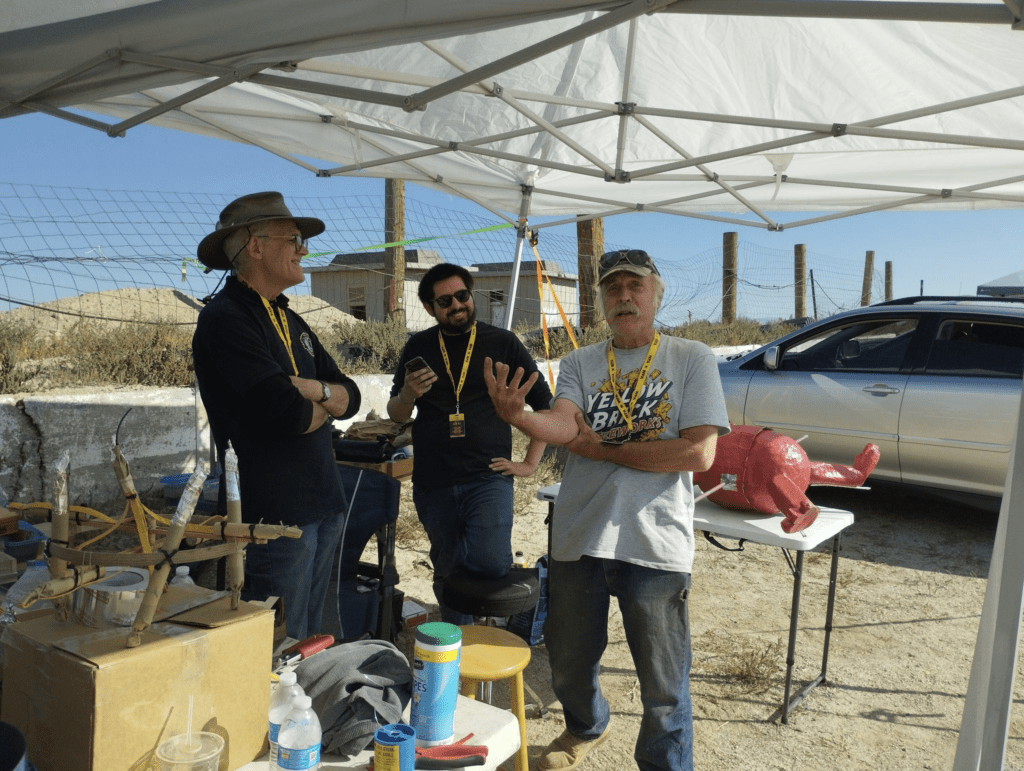
Do-it, Hawthorne, NV September 17-22!
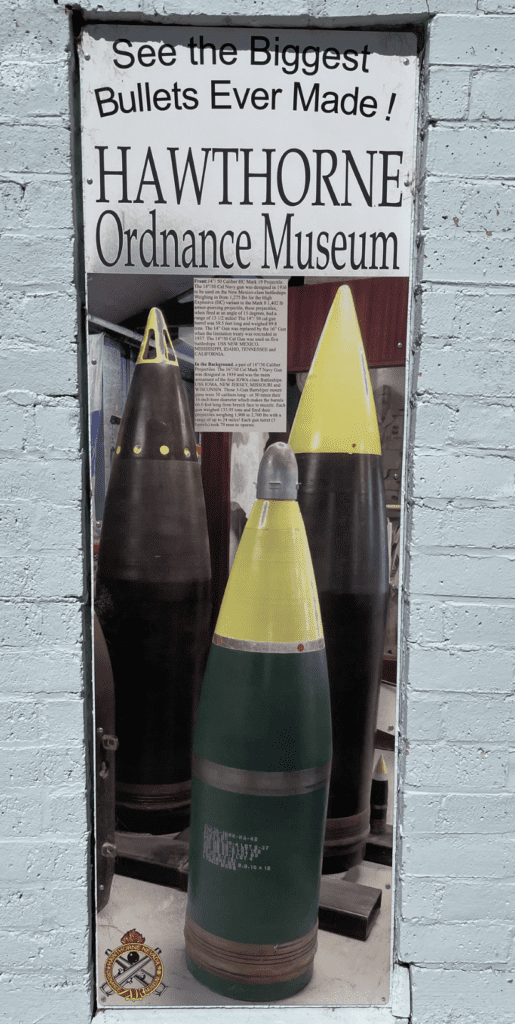
The Do-It 2024 is Tuesday Sept 17-22 in Hawthorne NV. It is fun!
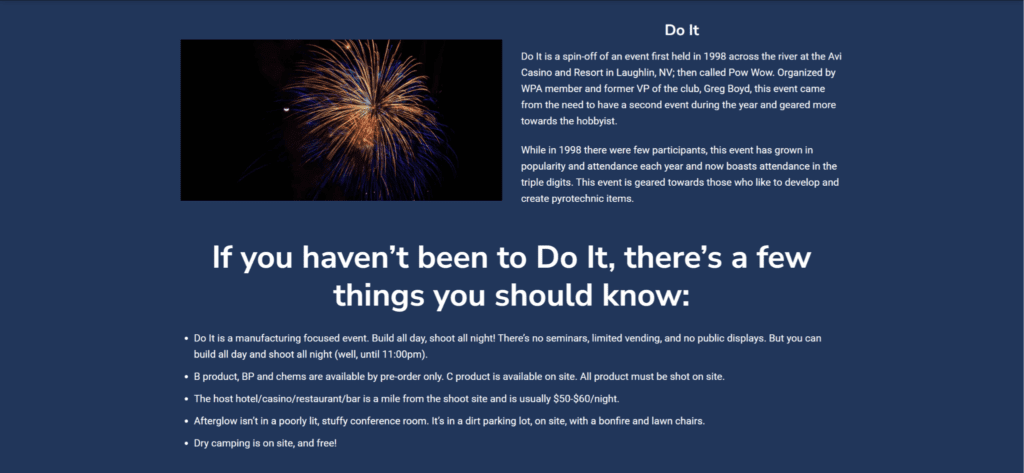
Host hotel info: https://elcapcasino.com/accommodations/
More info about the event is available at https://www.westernpyro.org/events/do-it/
My 4th of July - an Operator’s Experience
by Dennis Miele, WPA Secretary
Many of you know I am an Operator that shoots for Pyro Spectaculars by Souza. I’ve been
doing so for 22 years. This year, I returned to do the PAPA show up in Pacific Palisades, and
Concert for Heroes at Riverside National Cemetery. The concert was JUly 3rd, while of course,
the PAPA show was on the 4th. I’ve been doing Concert for Heroes for almost 20 years as a
favor. And this year, we had to drop equipment for PAPA on the 3rd. Let me tell you about my
days!
I got my paperwork for PAPA about 2 weeks before the show, and as usual I did my layout -
about a 100 more shots than last year. I got the music with cues only a few days before the
show and realized I only had 425 cues while the cue sheet showed 504 shots. As it turns out,
the music was correct and the cue sheets were wrong. So on the morning of the 3rd, I got my
corrected cue sheets. And now, I have to figure out time to create corrected cue sheets - but I’ll
get to that. My house in California doesn’t have a working printer, so I also had no way to print
any updated layout.
Dropping the equipment on the 3rd was a necessity given the size of my crew. Since the 3rd
was Wednesday, everyone had to work except my friend Kieth. So it was just he and I. It took
about 2 hours to unload. Not surprising you might say. But the thing with Palisades, the show is
set up in the high school quad - the truck can only back up so far and we are about 100 yards
away so we schlepping the racks twice. No big deal - did it last year.
Now I had to get back to the plant by 4 pm to pick up the Cemetery show. Call time was 5 pm
and I had a new AHJ, who also had 2 other inspectors with her since she was training them.
So, we left Palisades about 2 PM which was the plan. Well traffic was incredibly busy. It took2
hours to get out to the Palisades (normal is an hour and 15 minutes), so I expected 2 hours to
get back as well. Well about 20 miles from the plant, the truck broke down! Absolutely no
hydraulic fluid for the brakes! So, I had to wait for the repair guy. And because there was no
hydraulic fluid - you guessed it - they had to tow the truck back to the yard. So it was a 45
minute wait for the repair guy, then another hour for someone to pick us up. Didn’t get back to
the plant until 4:30. So I'm already running 30 minutes behind schedule.
I called the fire inspector to let her know. I also called my crew person and asked her to get our
sandwiches for dinner. I get my paperwork and go to the van. The American Flag set piece is
missing!. So I report that, and after 15 minutes, I get told to go out back and they will load the
set piece. Well, I get there, and the crew there can’t figure out which American flag set piece is
mine. So usually, the set piece is 4x8, but the only one available is 5x10. Definitely much larger
than any year previously.
So now, it’s 5 PM; and if any of you know traffic at the 91/60/215 interchange in Riverside, CA,
traffic at that time is a bear. It’s going to take over an hour to get to the cemetery instead of the
usual 45 minutes. So, again I call the inspector and let her know.
Now the cemetery show is small, rockets red glare, and the end of the national anthem, and the
shot cakes to the Sousa March at the end of the concert. We get on site, get the paperwork and
license stuff out of the way, and set up the national anthem stuff first to make sure we were
ready on time. After the anthem, we finished setting up the show. When it’s time to fire the
anthem, it turns out my crew member forgot her hard hat!. She cleaned out her car and forgot
to reload her pyro bag. See, she only does one show a year, and that’s with me doing the
cemetery show. No big deal, she’s back in the van during the anthem. And we proceed to finish
setting up the show.
The amphitheater in the cemetery is by Internment Center G. There is a big pond in front of the
amphitheater. So we also hang the set piece over the wall so it reflects off the water. This year,
I planned to do the set piece as the last shot so it had a lasting impact on the audience.
Well things didn’t go as planned. Somehow, the e-match pulled out as we put it over the wall.
Back to the plan it goes!
No problem. Got back to the plant and made it home so I was in bed before midnight. That’s
good - let’s me get about 4 hours of sleep since I have to be up at 4:30 AM. Call time for the
Palisades is 8 AM, so I need to leave the yard by 6:30 AM. I still needed to get ice for the day
which I got on the way to the yard. This year, there were NO issues getting the truck, and of
course, the racks were dropped off the day before. Running just a little late, soI ended up
getting to Palisades at 8:30. The crew had been informed, since I set up a text group for
communications.
To my surprise, I ended up with a crew of 9 with several new people. Interesting fact: 6 of the
crew work for JPL and one of the people is in charge of the land rover on Mars. Looking to see
how we can create and leverage a relationship with JPL and the WPA. Anyway, we get the
racks laid out and put together. And then we start wiring the shells. Each person has their own
position, with 2 people on the finale.
Somehow, after we got all the shells laid out, there were 50 extra shells. But the count of
product is correct. No problem. We improvise and double up shots leading to the finale.
Remember, I just got the revised cue sheets the day before. So we finish wiring and start
cabling. That’s when it hits me! There was no issue with racks or product. We are short a
slave and a cable! There should have been nine positions and we only had 8. So that’s why
there are 50 extra shells (not really!).
New dilemma now: the missing slave is 3:36 of music. So I talk to Matthew and the show
sponsor and give her the options. We decide we can edit the music and provide the DJ a new
MP3 file. Matthew is a wiz at Garage Master. So he was able to edit the beginning song, which
is the Armed Services medley, to start at the beginning of the Marines part of the song. The
match-up was great and you couldn’t tell we actually started in the middle of the song. Problem
solved! BTW - continuity was 100% on the first try!
Show went well, but we did not have a 100% shot. There were 7 pull outs and 8 finale chain
breaks. Oh what I didn’t tell you is last year I returned 5 chains of 2.5” finale chains - all had
broken match (came that way from the factory). I taped the box and wrote ‘LIVE’ on the top and
one side. I got that same box back as part of my inventory - I don’t think the box was ever
opened and the chains repaired, I had to do the repairs onsite this year. Believe it or not, only 2
single 2.5” shells were broken. The other 6 were 3” single finale shells.
So the field is cleared and we begin breaking down. This crew was amazing. After setting up
all day, we had the site cleaned and the truck loaded by 12:15 AM. Last year, we didn’t leave
until almost 2 AM. So I have everyone’s contact information and we are getting ready to leave. Except, someone closed the back of the truck and closed the padlock.
Oh no! Problem!! The truck keys are still in the back of the truck! We always place the key on
the right side of the tailgate so everyone knows where they are. I used to have a key to the
padlock since I did so much driving for other operators before moving to Colorado. But there
was a change in equipment manager so the master key was changed and I didn’t have a new
key. Well, turns out there were no other operators in the area. The other shows had already left
to return to the yard. So, I need to wait for a mobile locksmith to cut the lock. Surprisingly, it
was only an hour and a half.
After all is said and done, I didn’t get back to the yard until 4 AM on the 5th. It could have been
worse, as one mobile locksmith said they couldn’t get onsite until 8 AM!
Being a pyrotechnic operator presents challenges that sometimes need to be resolved. Typically, those problems are lack of continuity, a dirt connector or a bad cable. The problems I
faced and had to resolve this year I’ve never encountered before (well, I did have a truck
breakdown on the way to a show once, but that’s another story for another time!). But it still
shows you have to be creative and think on your feet all the time! In the end, the customers and
the audience loved the shows and everyone went home happy.
Czech Border Wild West - Big Fun in Vyšší Brod
by Mark Devon, WPA Communications VP
When in my wife's hometown of Linz Austria we usually go visit friends of hers up by the
Austria-Czech border. Just over on the Czech side are a number of tourist trinket stands and
“Outlet” stores run by Vietnamese. How did this come to be? During the “American war”
Vietnam had run up a large deficit in arms with their socialist brothers in the east bloc and in
order to repay the debt Vietnam sent slave laborers.
Ain’t communism grand? I wish we could do that here.
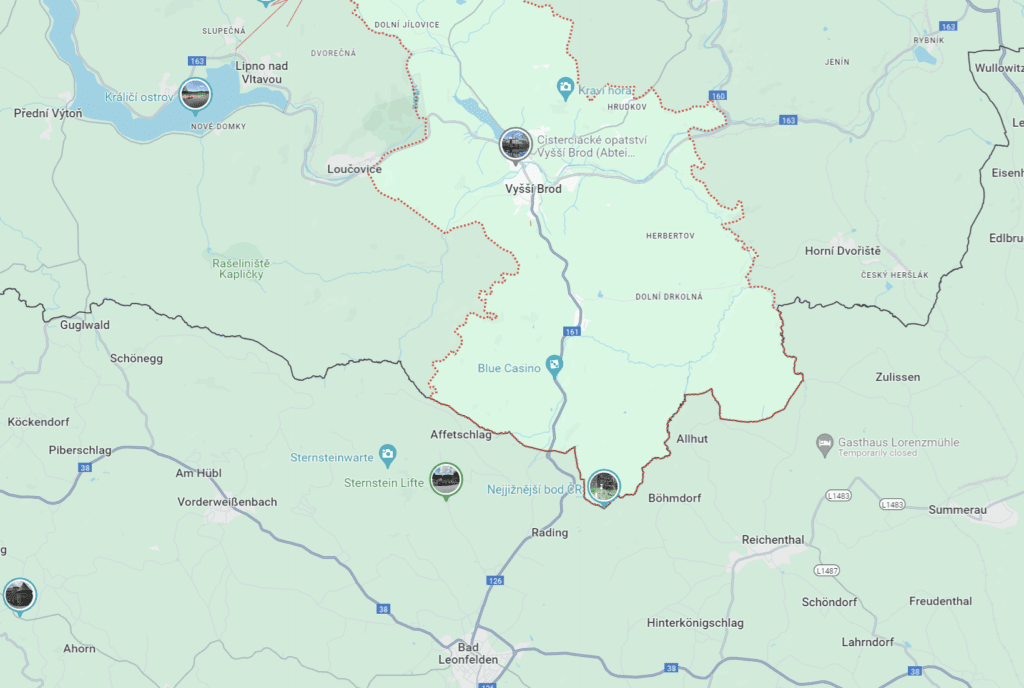
And there they stayed, beavering away until the end of communism in 1989. Rather than going
back to Ho Chi Minh paradise in Vietnam (see cake below) they stayed and opened trinket
stands along the border to take advantage of Austrian day trippers searching for cheap goods
they couldn’t get in their own more regulated/repressed country.
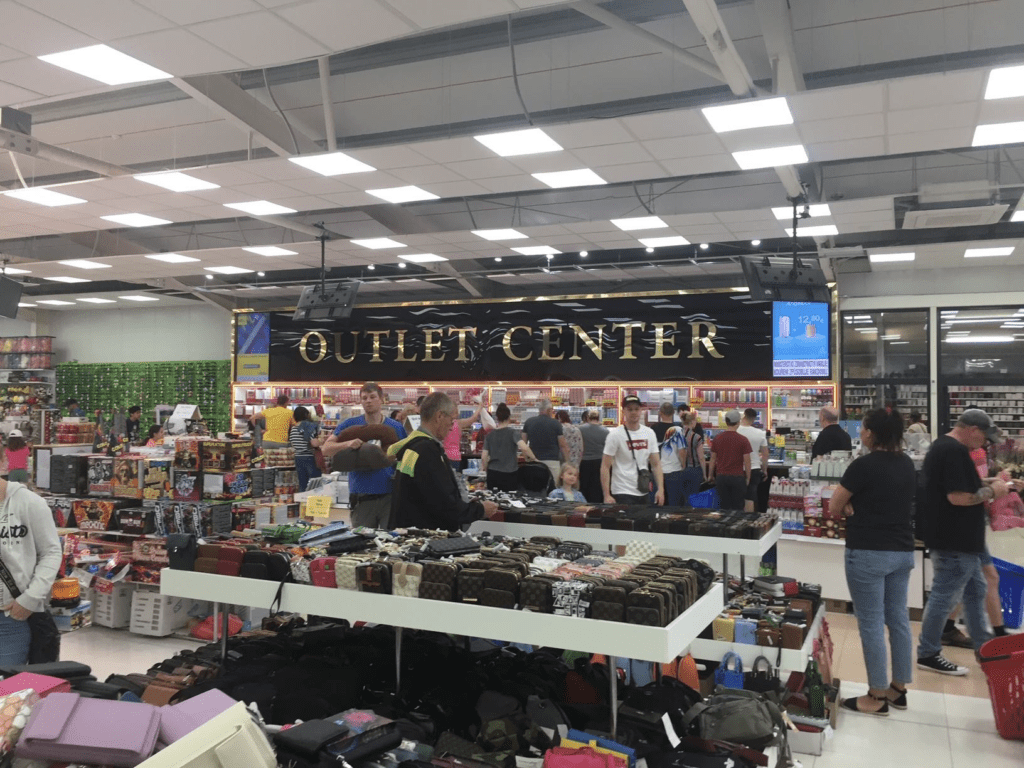
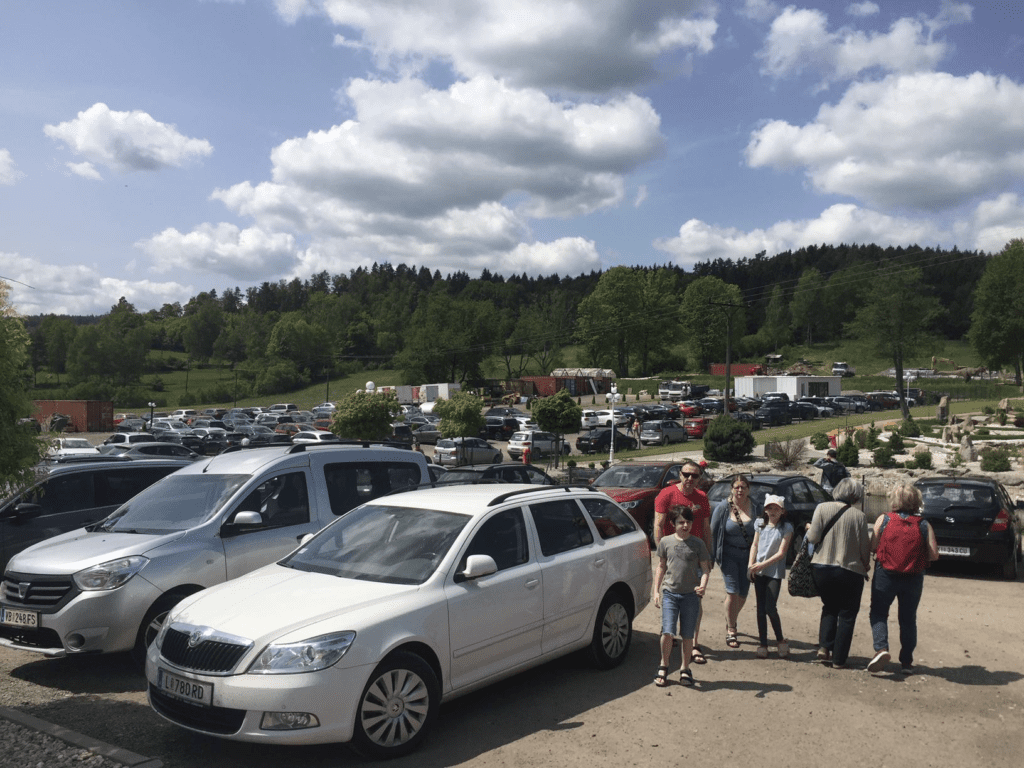
Whatever it is they are selling, the Austrians seem to go for it, this is the overflow parking lot. But unlike trinket stands you might encounter on a stop when your giant cruise ship stops in Mazatlan or Skagway these pack an extra punch:
1.3G fireworks. Well, overloaded cakes anyway. I didn’t see any 8 inch shells or even 3 inch shells. Still..
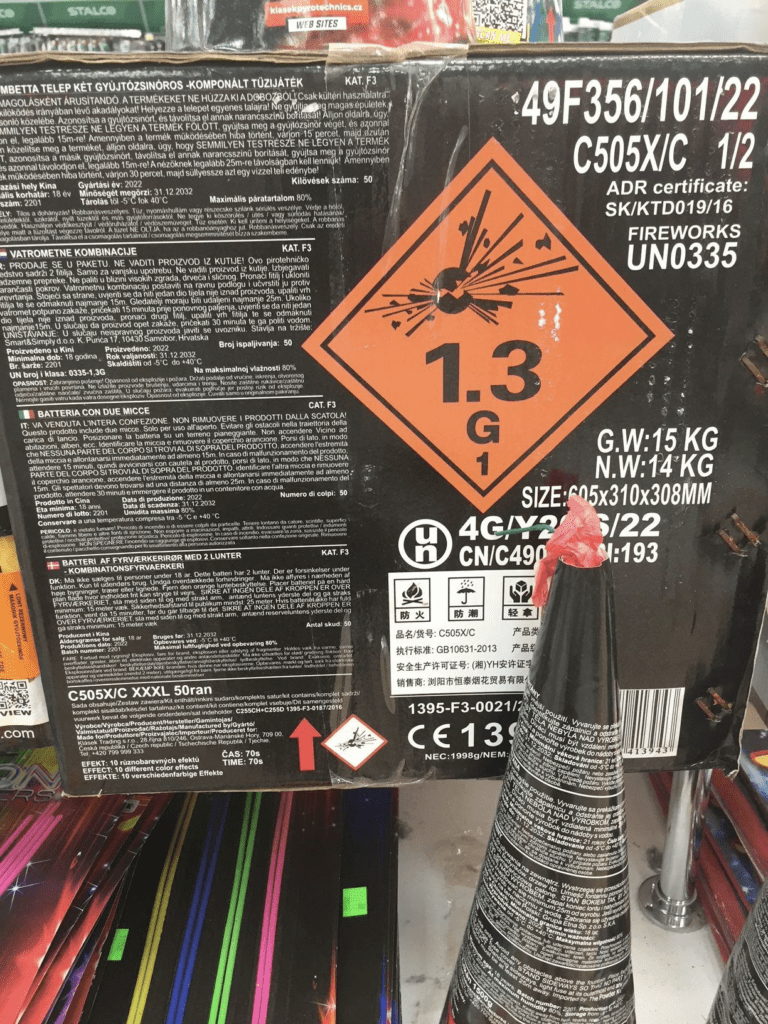

There are 22.6 Czech Koruna to the dollar which makes the Trump cake 939/22.6 = $41.
500g cakes at Western WinterBlast® are like $30 typically. So not bad pricing, I guess, for a fireworks
stand.
I notice the “1.3G” cakes have the European F3 designation which is still consumer grade. F4 is
professional grade. Maybe it’s some kind of marketing gimmick.
But wait, things get weirder:
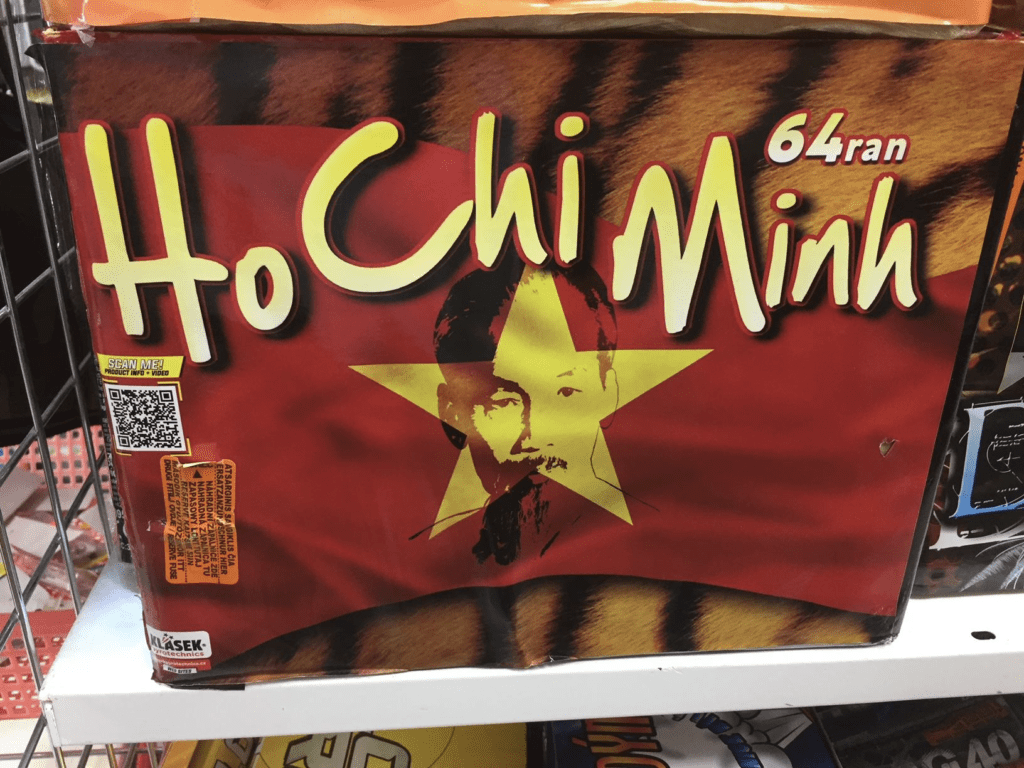
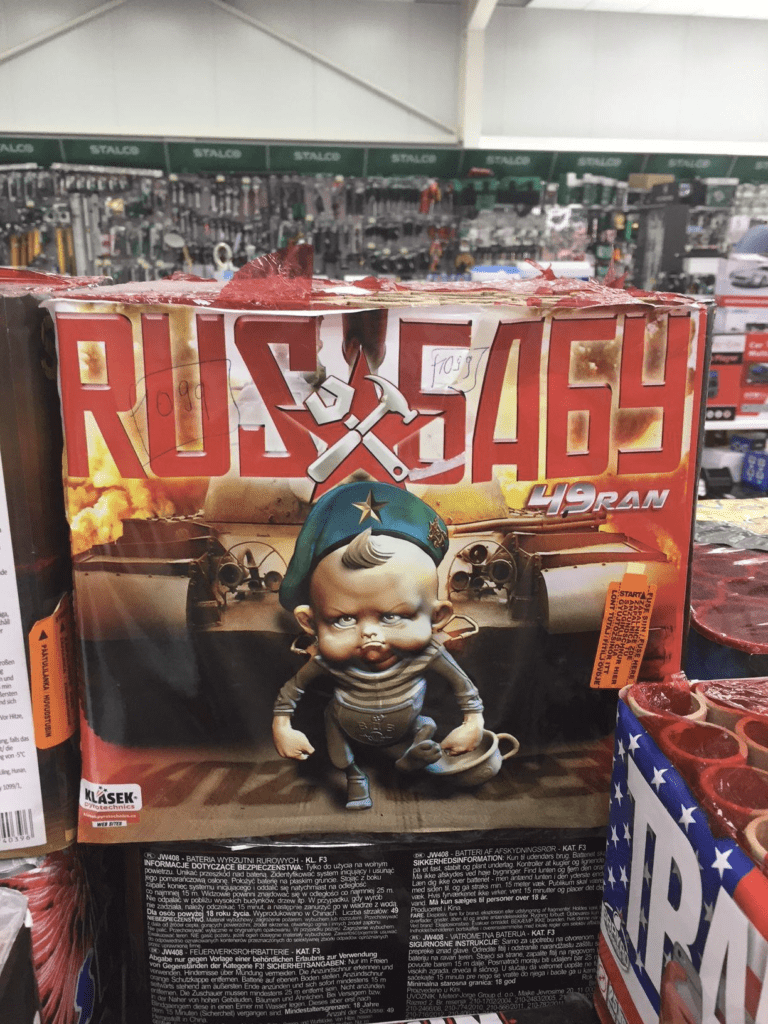
Russia Baby. Ok that is a weird name for a cake.
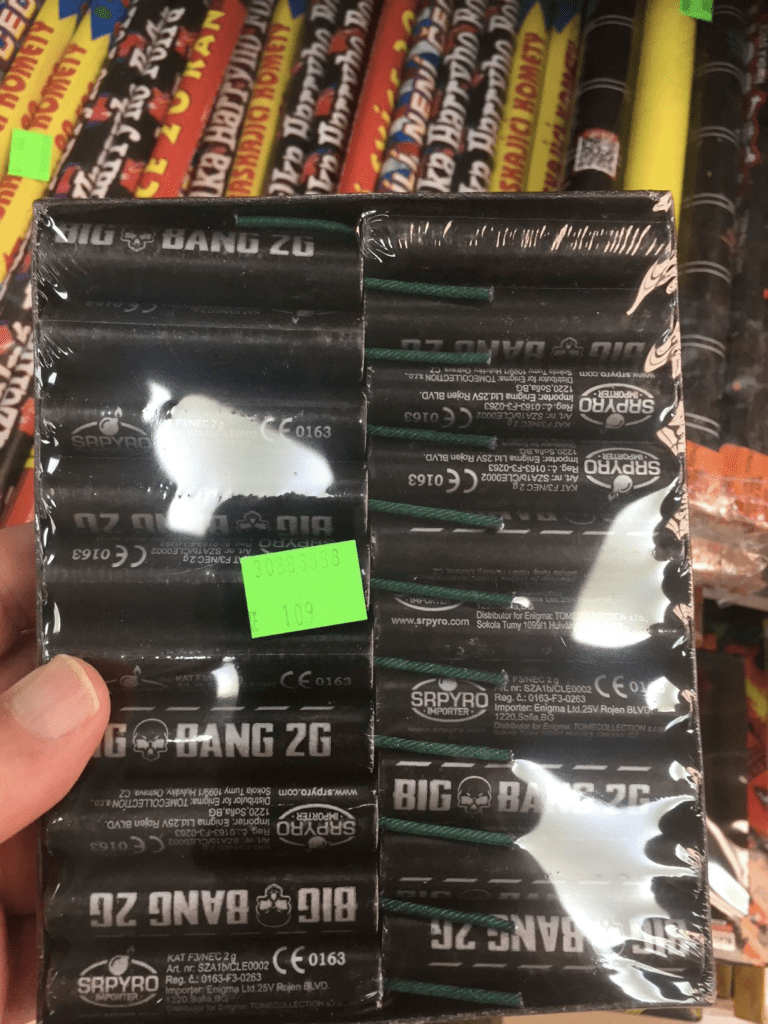
M-80s, I guess they don’t sell those in Pahrump. 2G means 2 grams of flash inside?
Still has the European CE and F3 consumer marks, must be a hoax. Maybe they have larger
allowances for flash content.
109/22.6 = $5 for the lot.
Other stuff you can’t get in Austria available here:


Ready to rumble, get into bondage, find` a new messiah. Or maybe just a beer and a sandwich.
All the comforts of home. If you go over there make sure to czech out Cesky Krumlov, medieval
fortress town in that area, it is beautiful.
Ruminations of the Pyro Dream Team - Roundtable Discussion
Part II: Tales from the Road
With Eric Tucker, Martin Heidelberg, Pyro Pete Cappodocio, and Patrice Guy. Moderated by Peter Rogoz of '76 Pro Line.
HEADS UP PYROS!
A full recording of the roundtable discussion with these pyro greats is available for WPA and PGI members to watch. Sign in to watch here: https://www.westernpyro.org/seminars/session/?id=5117
Watch Pyro Tech TalksTRANSCRIPT
[Topic: How to combine pyrotechnics with a “story”.]
Patrice Guy
What I was going to say is that for a competition, a good team, a good story is will make our
break. But I've seen also when you're in competition, guys starting with bad stories and they
should have corrected it before they did even the first.cue So once your story is done, the
soundtrack is done. Listen to it for a week before you start programing course. Sometimes you
you start in the wrong direction and you stay on it.
Peter Rogoz
Yeah, that's a that's a really good point, I think. I suppose there's different applications between
again, you get hired to do a particular part of a show or you're part of a story at large and
pyrotechnics or special effects or tool verses, you know, you're driving the entire story
yourselves anymore. How often do you guys get to drive the story yourselves versus being part
of the larger production.
Pyro Pete
You know, it's like, so I just did a big filing system for the band Disturbed, and they decided to
not have a video wall and to only have flames. So we got to do a lot where the flame system is,
is fully controllable, proportional valves on everything. So we became the the the flames burned
for 80% of the show.
So we were actually bringing up the intensity, bringing down the intensity. So we became a part
of the show, more of just a punctuation because a lot of times we may because got to
remember, see, I started doing special effects. I didn't start doing pyro. I started blowing up cars
and busses and things, and then I saw firework shows and I was like, Wait a minute, I mean, we
could do this thing in the music?
So usually for me it was some sort of weird punctuation or something, you know, that wasn't the
show. But now with flames becoming people relying more on flames and and CO2 and cryo and
and you know, now that the company I'm with now we have lasers. So now as an effects
department we start becoming more driving the show coherently because if you remember in
the old days, well the effects guy would bring the low smoke machine, but the lighting company
would bring lasers and it would always kind of be a mishmash, right?
You know, like, and then there was battles going on on, well, I need more smoke. I need less
smoke than it ended up. But now it seems that the disciplines have come together. So we are
working with drone people and we are working with laser people. So now instead of just being
the pyro guys, now we're at all the meetings now. Instead of just the finale meeting.
Eric Tucker
I totally agree. I think that the storyline and supporting the storyline, there's different disciplines,
right? Peter you're talking about being on stage and that's a separate discipline. You're
supporting a performance right? And then working with other media is doing a television show is
a completely different discipline, doing movies and those kind of effects is a different discipline.
But I find it very satisfying Now when you when you've got all of these mediums together and
you're all working together and suddenly you're a jazz ensemble and everybody's playing
together and everybody gets to step forward and step back and, you know, when it's happening,
you know, and it's right, right. And you try not to try not to step into somebody way.
And I think that's it. That's what I find more satisfying these days than anything else. It's hard. I
find it difficult to do you.
Pyro Pete
Right, Eric, You hit on something. They're very important. It's that seamless transition, you know,
from the stage pyro to the video. Look to the aerial pyro. And if the audience doesn't even
realize, you know what I mean? The transitions, they're just like, wow, it just all happens
seamlessly. Because as I remember in the old days, it kind of seemed disjointed, you know,
even at aerial shows, if aerial shows had some video element, it took a minute for that to kind of
get sorted out.
You know, now that's we take it for granted. Now what we can do versus what we could do even
five years ago.
Eric Tucker
It's different drones, right, dealing with drones as an element and and letting them do what they
do. And I think when you do it right and everybody's working together and it feels great and then
the video truck shows up and everything goes in the shitter, right? Because all the rules change
instantly, Right? You know where your horizons are.
You know what you're doing. And all of a sudden the video guy is.
Pyro Pete Yeah, we're going to move everything to the right.
To the right different discipline completely if you start out that way and it's a television show and
you know you're doing a TV show live TV show is the weirdest one, making sure your director
understands what you do and when you do it and then I think that that animatics that we're
using now, like finale 3-D, those are imperative, right?
That's how we're going to combine this stuff and explain it to somebody who's going to actually
take what you do and hand it off to your real audience. Because once the TV show up, your live
audience is a prop. A prop. They are not your audience. They you know, and it's a weird
transition to make because we're so used to the applause and stuff from from the audience
Pyro Pete
And so we talked about this the other day for a minute, too. Like when that you said when the
the camera truck shows up, you're screwed because you'd been doing your show and now
they're going to film it. So now it's no longer you know, the question is, is this a live
performance? First and then we're letting you film it or is it a film thing and that's the most
important, you know, because like I said, then it changes everything. And I guess it's the same
thing with drones, too. You know, if they start pulling the camera or like, produce, how many
times a day can you redo that again? can you do that again? Okay. Can you move them up five
feet? Like you must get the same stuff we do.
The flames look great. Can we move everything over ten yards?
Patrice Guy
yeah, we get that. Well, yeah, I mean, I mean, you just know we can't. That's the answer. Give
us about an hour. We'll reprogram it, change the batteries, then we'll do it.
Eric Tucker
Thane Morris, once we're at a show and Thane is walking and he's got a camera, a big ass lens
on it, Right? And. And he stops and he looks at many points at it, and he goes, This is your
audience now and keeps walking right through sound advice, right. So why is it why is it the
video, guys?
Peter Rogoz
It seems like when a video truck shows up, every other performers suddenly shifted into working
towards a video. Are there ever situations where video actually tries to accommodate what it is
you guys are doing on tour?
Pyro Pete
On tour we play nice.. We have meetings and you know, we hate having to throw big balls of
tape at the camera guy because he's standing next to the pyro, you know, So it's it's when they
decide to film your event. we're you know, we're going to we're making a video of the show or
we're going to be on the news tonight, or we had this one on one tour where they shot an
episode of was Beverly Hills five two or whatever the hell it was in the backstage of the show at
the Stones, at at the Rose, the Rose Bowl 20 years ago.
We did a whole fake soundcheck so they could shoot 5 minutes of the TV show that they were
supposed to be like at the concert. And that just screwed us up for the whole day because that
whole day, which would normally have been our prep day and our rehearsal day, became
nothing but the TV show. And that's like what I said earlier.
You have to - What is the event? Is the event. What is first? Is this a live event that you happen
to be filming or are you filming in you know, I mean, are you is filming the primary thing and then
the cameras because what like we talked about in no time you know you can have a look that
looks great from the audience, but the camera's going to miss it because the cameras close up
on a person.
So the director would go, well, can we save that Look for somewhere else. So now you tend to
shoot out of sequence and you shoot out of time to the music because it's going to be edited in
later anyway and that. So that's why once they say, they're going to start filming, yeah, just get
ready to move stuff a lot.
Eric Tucker
You come to grips with the term “b roll” we'll just be rolling, right? And we'll fly that in later. It's
different rules, different techniques. So that's primarily we're talking about designing for video
here.
Peter Rogoz
What about for designing for the live audience, But you're in support of a live performer. How
does that change things? I mean, I suppose you were you guys were talking about multimedia
and how you can shift the perspective of people where they're looking and kind of use it as a
transitionary sort of medium. But how does it change you guys in design? I mean, are you guys
sitting down with artists and are artists dictating these things? Is a creative director usually
dictating these things? Do you guys bring the effects to the table and tell them what you're going
to do? How does that usually go?
Pyro Pete
All right. So say I get a phone call, right? And they want flames and they want pyro and they
want a lift show or an aerial show. All right. So then I got to start figuring out who I'm going to
call. Well, Flames and Pyro. I got a they want an aerial show. Well, do they want aerial or do
they want close props? You know, 200 foot close props if they want aerial, I'm calling guys like
Eric. I'm making some phone calls, you know, if they only want, you know, So you got to figure
out what the client will come to you. And so we we want everything. We want lasers. We want
smoke, We want we want flames. You want this? Okay, well, where are we? Are we at a
proscenium theater? Are we in a 5000 seat theater? Are we in an arena? Are we in a stadium or
are we doing Shed's a summer tour? So it was the same thing for you aerial guys and the drone
guys that your first question is going to be, Well, what's my talent?
What do I have? How big is my area? And then you design for that. So on some shows we
have an A, B in the C show. So if the band is going to do arenas and they're going to do
stadiums and then they're going to do dome stadiums, well, a stadium with no dome, no roof, no
cover, that's an air show.
We're shooting. We're going for a 350 foot product. Now. I got a stadium with a dome. Well, now
I got 100 foot product. That's a B show. Well, now they're going to go into an arena next
Tuesday. Well, that's the C show. That's a regular kind of stage show. C, So, yeah, once you
start having to put a tour together, you know, you got to find out what what are our venues and
then budget and then they, they want everything, but they don't want to pay us. But we all know.
Patrice Guy
That not only that that on, on some shows you're the designers on other shows you don't design
anything. You got a guy with the tour and that's what he wants and don't move from that brand
and you're your hands are tied and yeah and usually after three or four concerts, he starts
listening to you.
Pyro Pete
Yeah, I've had the cues sent to me on, Here's the music and here's the time code. Just, yeah,
you get everything from that to people that are just like, Well, what can you do? And then you
just start sending videos back and forth, you know?
Patrice Guy
And one time I did, I did. I did the Asian Games in Shanghai, and I got the first meeting with a
big producer. He had just come from doing the Academy Award and, you know, in Hollywood.
And now he's there directing the Special Olympics. And we have the first meeting and all, you
know, sound and light and it goes to bird.
Give me - I want big stadium shots. You know what I want? And he goes to do that. And that
was it the first.
Pyro Pete
Now I'm going to get into stories for 14 years. I do the season finale of American Ninja Warrior.
So it shoots in Vegas. It's just a flame system. The first two years, the director is like, All right,
I'm going to give you up. Pyro goes hot and a pyro ready and a pyro go. And by the third year,
he's like, Pete, good to see you.
You know what you're doing? Okay. I need a meeting with the lighting guys over here. So right
after you, you know, I got this boss, and then they let you go for.
Peter Rogoz
The general rule that we always got taught was you never upstage the talent, right? Never
upstage the talent. You're in support of that performance. And then I walk out of my first Rolling
Stones job with Pete and found out you cannot upstage the Rolling Stones. Not possible. Do
whatever you want. That was fun. yeah. So in your guys's opinions, what are the artists you
cannot upstage out there? Who's out there on stage?
Pyro Pete
A Tina Turner? Well, she's not out there anymore but - you could not.
Peter Rogoz
Yeah. Yeah. Nothing. Gaga.
Pyro Pete
Yeah, Gaga.
Peter Rogoz
You can't put you can't push over Gaga.
Pyro Pete
Of all of this I'm still AC DC Yeah yeah.
Peter Rogoz
No I agree.
Pyro Pete
It have to be some of the older acts because honestly some of these deejays and things that
that we do it's like the guy on stage with a laptop then we are the show he's the guy you know
so those ones confuse me. But.
Peter Rogoz
We're getting old. Peter Yeah.
Pyro Pete
You know, here's the thing. You say, Okay, well, we'll edit this stuff later. Honestly, I'm like a lot of
the newer bands, I don't like. Yeah, you could. They want everything, but they need the help.
But they but they grew up that way too, because remember, bands of our era, kids and you can
tune out now tune back in in a minute.
To be continued in Part 3!
ANALYSIS OF THE SUCCESSFUL LAUNCH OF A 1,575 MM SHELL WITH COMPARISON TO EXTERNAL AND INTERNAL BALLISTICS STUDY
by Eric Krug & Jim Widmann
Eric Krug Krug Consulting LLC 1416 Windy Gap Road Loveland CO, 80537 USA
[email protected], and
James C. Widmann Connecticut Pyrotechnic Mfg. LLC 15 Glen Road Sandy Hook CT, 06482 USA [email protected] www.ctpyro.com
ABSTRACT
A team was formed in North America to attempt the launch of a 1,575 mm aerial shell with the
goal to obtain a new world record. The design of large shell casings, internal pyrotechnic
components, and the engineering design of the required mortar has previously been published.
The first attempt on February 9th, 2019, resulted in a malfunction of the shell in the mortar
producing a large flowerpot failure. The resulting integrity of the mortar and the failure
mechanism of the shell were of great concern. Undeterred, the team immediately began work
on a second attempt that resulted in a successful launch on February 8th, 2020. This paper will
review the analysis of the mortar after the failure, the process of rebuilding the mortar, additional
engineering analysis, and changes to the shell design. A successful internal pressure profile
was obtained and will be compared to the previously published internal and external ballistic
mathematical model.
INTRODUCTION
The pioneer American auto maker Henry Ford said, “Failure is just an opportunity to begin
again, this time more intelligently”. And that is what was done after our initial failure. After much
analysis and discussion, it was agreed that the cause of the failure was likely due to a
combination of factors. The shell casing and pasting proved to be of insufficient strength. The lift
charge was probably too fast burning and in our next effort we would need a slower evolution of
gasses. The “headroom” between the shell and the bottom of the mortar may have been too
shallow. These and other hypotheses were discussed and then a course of action was plotted.
First, the mortar had to be inspected in situ for damage and its structural integrity assessed.
Repairs would have to be made. This process turned out to be quite extensive and is covered in
detail later in this paper. In anticipation of this type of failure. The author, Eric Krug had designed
the mortar to withstand an explosion of considerable magnitude. The design proved to be quite
robust as the mortar stayed in one piece and sustained only modest damage. Construction
details for the mortar were given in Reference 1, a paper presented at the 17th ISF in Puerto
Vallarta, Mexico1 . Changes were made in the shell construction to increase its strength. This
would include a thicker casing wall by increasing the amount of paper pasted on the shell.
Additionally, changes were made to the pasting process and a different brand of gummed paper
tape was used. Other changes to the fusing of the shell were made and several proprietary
changes were made to the WASP2 machine that pasted the shell. Construction details of the
shell made for the first attempt were given in Reference 3. Finally, the grain size of the lift
charge was increased and disbursed in a different manner. It is thought that these changes
played a significant role in lessening the stress put on the shell during the launch. The shell was
also placed farther away from the mortar bottom to create more headroom so as to reduce the
stress on the shell during the launch. MORTAR EVALUATION While the design and
manufacturing of the next shell was occurring, an evaluation of the condition of the mortar was
started. The mortar appeared intact, but it was known that some form of repair would be
needed. Detailed examination only occurred in May of 2018 since the mountain location of the
mortar was covered in snow which restricted access for heavy equipment. Once the snow
melted, a quick internal examination of the mortar was performed, and it was discovered that it
had filled halfway with water. It was observed during the initial excavation for the mortar
placement that there was a lot of flowing ground water in this location. The presence of water in
the previously completely sealed mortar indicated that there was either a split in the side of the
mortar or a separation of the plug from the main tube. Pumps were used to evacuate the water,
which then revealed a large amount of shell debris from the explosion. It took a full day to
remove all the water and debris. Figure 1 shows the discovered weld separation between the
bottom plate and the wall of the mortar on the inside of the mortar. This also shows the severe
bending of the 25.4mm (1 inch) bottom plate as the water was at least 25 mm deep in the
separated area.
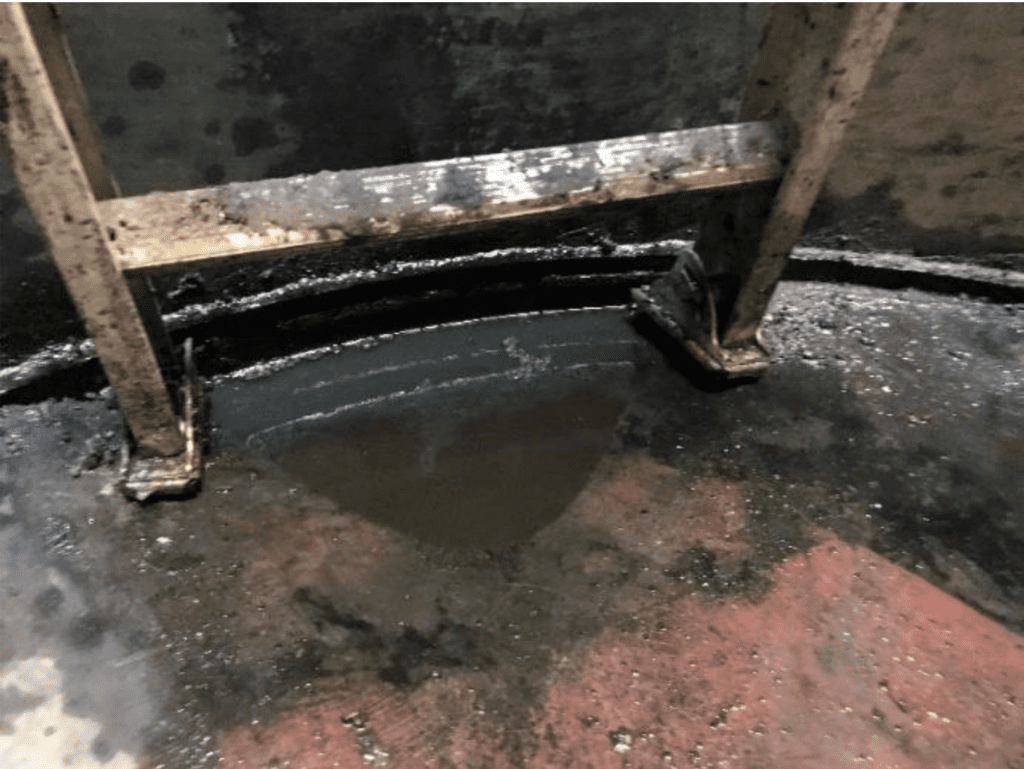
Fig. 1 – Weld separation of bottom plate and the wall of mortar
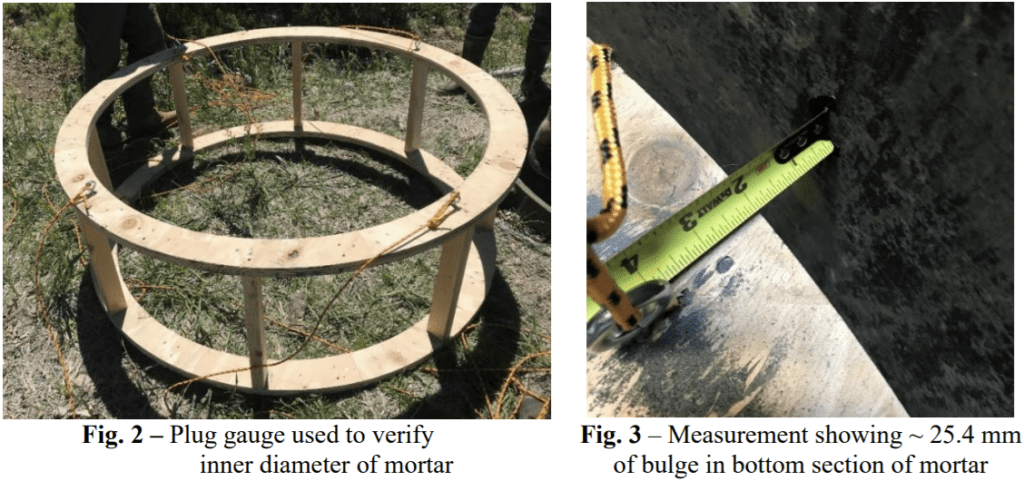
A plug gauge was designed and built that could be lowered into the mortar to measure any
bulge from the excessive pressures. This was easier than using a tape measure due to the
difficulty of knowing if the tape is aligned and level. The gauge was 1.55 m (61 inch) in diameter
and could easily be lowered into the mortar around the ladder. Moving the gauge from one side
to the other would indicate a 25.4 mm (1 inch) gap. Anything beyond the expected gap would
indicate a bulge. Figure 2 shows the plug gauge ready to be lowered into the mortar. The
interior of the mortar was measured from the top to the bottom. The welds and wall integrity
were visually examined. The top section was 2.43 m (8 ft) tall with a wall thickness of 12.7 mm
(0.5 inch). The middle section was 2.43 m (8 ft) tall with a wall thickness of 19 mm (0.75 inch).
The top two sections of the mortar did not show any signs of damage. All welds between
sections were intact. Peak pressure would be expected in the lowest section of the mortar,
where the lift and shell exploded. Bulging of the mortar was visually observed. The plug gauge
was lowered through the bottom section of the mortar while measuring the inner diameter.
Figure 3 shows a measurement in the lower section indicating a bulge of about 25.4 mm (1
inch). A few locations were found where the bulge was greater than 25.4 mm. However, no
cracks were found on the sides of the mortar, nor any damage to the welds on the side of the
mortar.
MORTAR REPAIRS
The team discussed multiple options for mortar repair. Worst case, the mortar would need to be
removed from the mountain and the lower section replaced. This would take well over a month
of time, add a huge expense to the project, and would not be well accepted during the busiest
time of the outdoor sports season in this year-round resort area, so the mortar was left in place.
The bottom plug was most likely pushed out of the mortar tube, and it was assumed that the
bottom plug welds were compromised.
The team was very happy that the mortar was mostly intact, but there was concern that the
mortar would not withstand a second catastrophic failure. That would most likely split the mortar
in half and a new mortar would have to be fabricated.
Based on the understanding of the pressure profile during a normal shell launch, the mortar
would most likely work just fine in a normal launch condition. The material thickness had been
chosen with a factor of safety (FOS) of 5.0 which indicated that the proper safety decisions were
made during the design and installation of the mortar.
It was decided to leave the mortar in place and perform upgrades to the bottom plate and the
internal walls of the bottom section of the mortar, all from the inside of the mortar.
Hoop stress analysis was used during the initial design of the mortar to determine the material
thickness for the expected peak pressure. The condition of the original lower section of the
mortar tube was unknown but it was assumed that it would provide some level of safety
containment if there was a second catastrophic failure. It was decided to add an internal liner in
the high-pressure region of the mortar to increase the strength of the mortar by supporting the
expected pressures of a normal launch.
This same technique was used to determine the FOS of various internal liner configurations that
could be installed from the inside of the mortar. The following formula4 represents the hoop
stress calculations where is the resulting hoop stress, is the internal pressure, is the outside
radius of the mortar section, and is the mortar wall thickness.
It was decided to add two layers of rolled 6.35mm (0.25 inch) ASTM A572 Grade 50 steel plate
to the bottom portion of the mortar. This additional set gave confidence of increased safety
since new materials were used in a known condition. Other liner configurations were considered
but they posed logistical installation issues. The first layer of liner would be welded to the
existing walls and the second would be welded to the first liner but rotated 90° so the seams on
the first layer would be covered.
The factor of safety (FOS) for the liners was calculated using the following formula where
represents the material yield strength. This steel has a minimum material yield strength of 345
MPa (50,000 psi)5.
The resulting FOS was calculated to be 2.52 which is much lower than the original minimum of
5.0. However, the liner plates would be in addition to the existing mortar structure and the
surrounding packed backfill around the mortar. The team assumed that this would provide
adequate safety.
Most of the upgrades to the mortar were done from the inside of the mortar using the following
plan:
- Before any internal work was done on the mortar, a sump pump was installed in a dedicated
well tube adjacent to the mortar to remove any water that could build up around the outside of
the mortar. Figure 4 shows the installed well tube containing the sump pump. The plan was to
inspect the mortar one week before the launch and pump out any water that had entered and
allow the mortar to dry. - From inside the mortar, weld the seam around the damaged bottom plate to help reduce
intake of water. - Use compacted fine sand to fill the exposed voids on the bottom inside of the mortar to level
the surface in preparation for an additional bottom plate. This was an attempt to equalize the
support across the bottom of the new bottom plate since there was no longer access to the
original vertical supports. - Install a second 25.4 mm (1 inch) steel bottom plate on top of packed sand. Use multi-level
penetration fillet welds along the periphery of the plate to hold it in place and provide additional
sealing. - Install the first layer of 6.35 mm (0.25 inch) steel plate liners. Use strap material and welds
to fill any gaps between the ends of plates. Backfill the voids between the new liner plates and
the original mortar walls with fine sand to help eliminate unsupported voids. Use plug welds in
random locations to secure the plates to the existing mortar wall. - Install a second layer of 6.35 mm (0.25 inch) steel plate liners rotated by 90° against the
first layer. Since both sets of plates were previously rolled out of flat material, there was
adequate contact area between the layers with minimal voids. The second layer was plug
welded to the first layer of liners in random locations to help them act as a single entity. - Use large fillet welds along all gaps and the top and bottom of the plate to secure it in place.
- Install new shell stand made from steel angle.
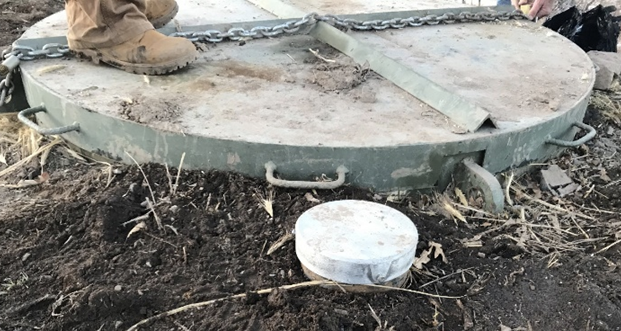
Fig. 4 – Sump well tube installed next to mortar.
The modifications to the mortar were not trivial. The bottom plate and liners are very heavy and
had to be craned into place. Large welding equipment had to be used for full penetration of the
thick materials. Figure 5 shows the setup during the mortar modifications. Note the large
exhaust fan along with the fan that is routing fresh air into the mortar. Note the tubing coming
from the sump pump well to evacuate water. Figure 6 shows details of the inner liners and shell
stand after installation.
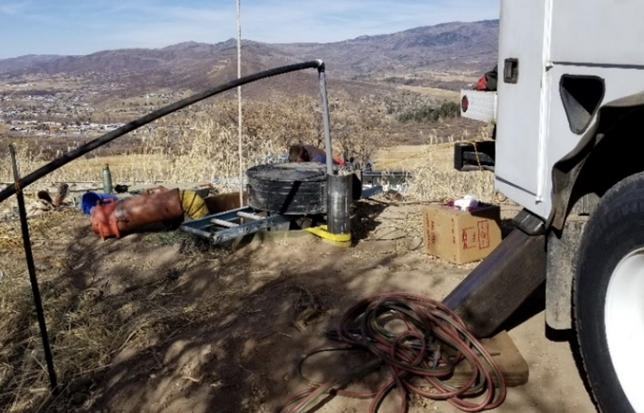
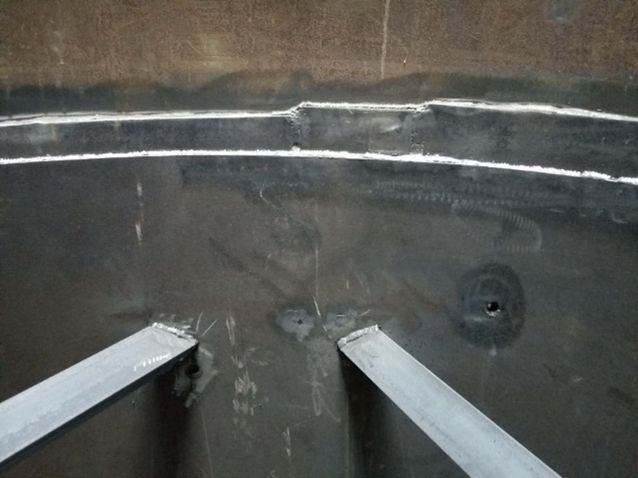
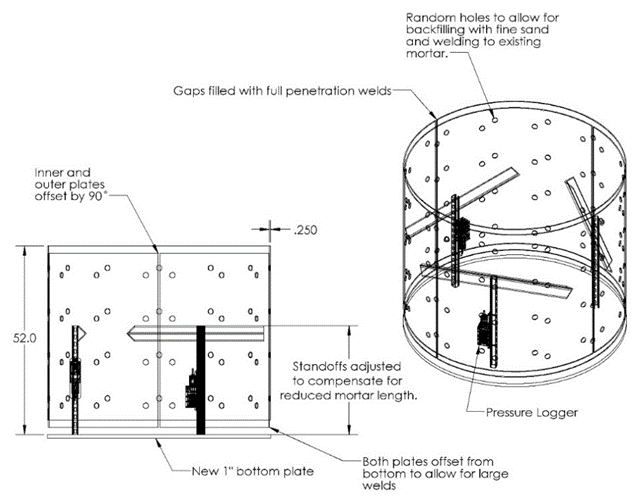
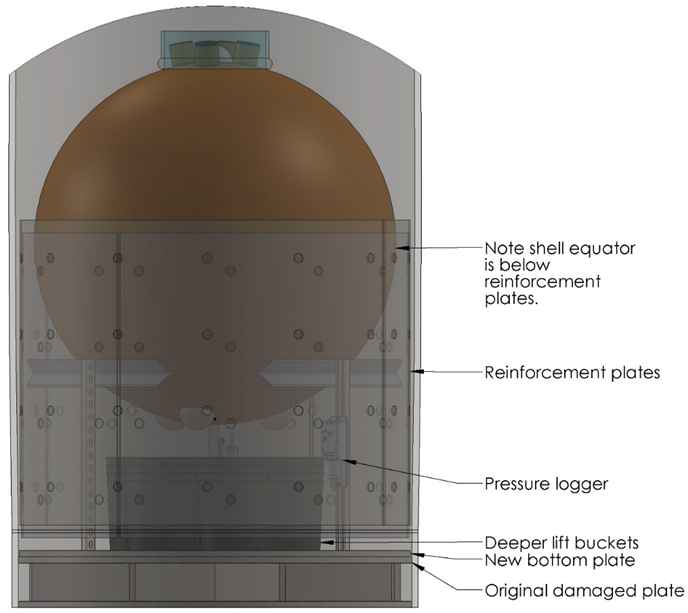
Figure 8 shows the installation of the liners along with the shell on the stand. Based on the
expected pressure profile, most of the higher pressures will take place in the section of the
liners. The height of the shell stand was adjusted to keep the equator of the shell below the top
of the liners. This would confine the higher pressures within the reinforced area.
All mortar repairs were completed by the end of May 2019.
SHELL CONSTRUCTION
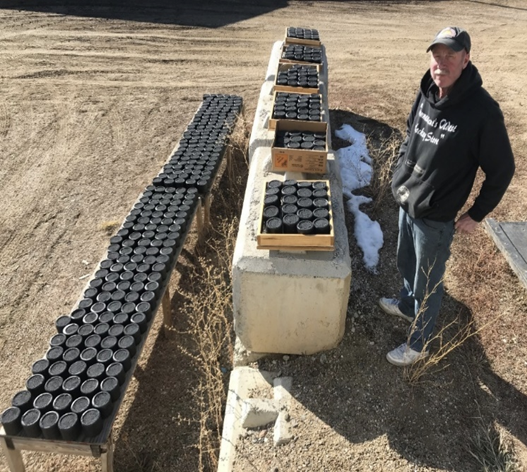
The stars used were 1-kilogram cylindrical slugs of a phenolic resin/hexamine bound black
powder-based formula. They were primed with 4FA grain powder and encased in heat-shrink
caps to encourage them to burn from one end only. Figure 9 shows the completed stars ready to
load into the shell.
On the first shell build, the stars were installed with the opening of the shell on the top. This
proved to be difficult and required the shell building author, Jim Widmann, to enter the shell
casing and load the starts from the inside.
For the second shell build, the stars were laid into the casing with the access hole located
horizontally to allow easier placement. Figure 10 shows the installation of stars through the
access hole. The stars were adhered to the casing wall with construction adhesive. After about
1/3 of the shell was filled it would be rotated on the WASP machine. When loaded, the shell
contained 380 stars. To prevent migration of the burst charge, voids were packed with crumpled
paper. The shell was then filled with a burst charge of milled black powder on 9.5 – 25.4 mm
cork (3/8 to 1 inch).
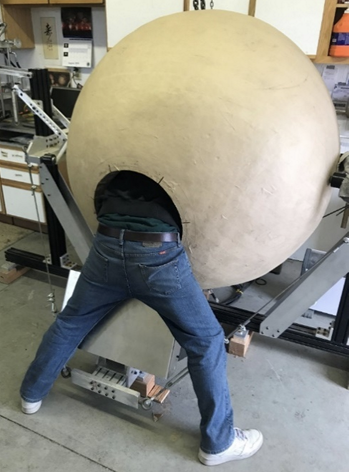
Considering the first shell’s failure, increasing the overall strength of the shell was imperative.
The remedy would start with increasing the thickness of the casing and pasted paper applied to
the loaded shell. Each of these values was increased from 76 mm (3 inch) to 95.25 mm (3.75
inch).
We also paid great attention to the application of the gummed tape. Samples of the fallout
pieces from previous shells showed fractures between layers of the paper. These occurred
periodically throughout the wall of the casing and the pasted paper applied on top. It was
conjectured that the fractures happened between pasting “sessions” and could contribute to a
failure. A session is the period of time during which layers of pasted paper are applied. For this
shell, that time was approximately 4 to 6 hours. A session was concluded when the shell
surface became mushy, and the drive wheels started to dig into the paper. The shell was then
lifted off the WASP machine and allowed to dry. Each session put on between 12.7 mm (1/2
inch) and 15.9 mm (5/8 inch) of paper depending on the size and weight of the shell. It is
believed that the observed fractures corresponded to the drying periods between pasting
sessions.
To address this problem, the authors made sure to wipe down the entire shell with a wet sponge
before resuming pasting sessions. The gummed tape was also applied in a very wet state so
that it would properly adhere during the initial layers of each pasting session.
The authors also switched to a different brand of gummed paper tape. Even though tapes may
test equal in tensile strength, the adhesive they are coated with makes a large difference in
performance for this application. Additionally, the papers used to manufacture these tapes
contain different amounts of recycled product. This problem became apparent during the early
pasting of the loaded shell.
The loaded shell weighed over 907 kg (2000 lbs.) and the strength of the paper is severely
strained during its application. When a shell of this weight travels over the drive wheels of the
machine, the tape can be “stretched loose” from the preceding layers. A high-quality tape
material that can handle this stress was essential.
This problem was discovered after applying approximately 25.4 mm (1 inch) layers to the loaded
shell. Good adhesion was not being achieved between layers. Therefore, the solution was to
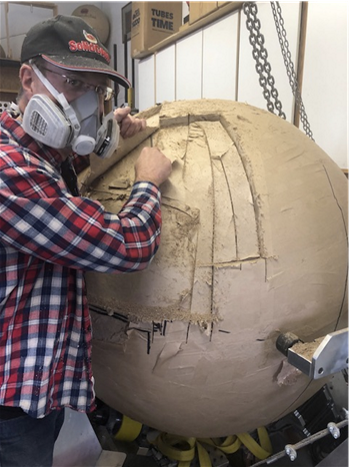
use a higher quality gummed tape, but first, the inferior tape had to be removed and this took a
full day. It was very disconcerting using power tools to saw into a loaded shell to remove the
layers. Figure 11 shows the removal of the inferior pasted layers from the shell.
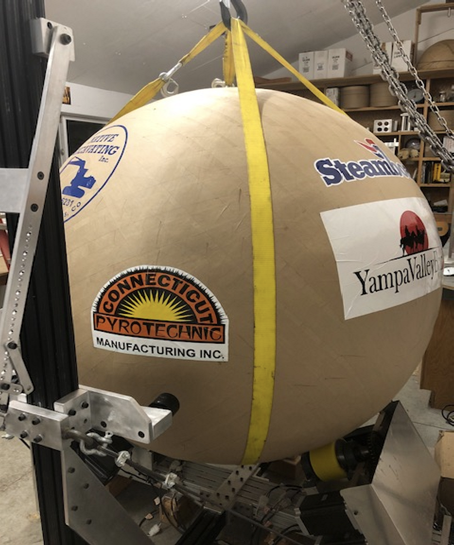
The new tape worked much better. The next two weeks were spent applying tape to the shell
until it reached a diameter of 1441 mm (56.75 inch). Figure 12 shows the completed pasted
shell.
REVIEW OF MATHEMATICAL MODEL INPUT DATA
The results from the original mathematical model provided enough information to design and
fabricate the original mortar. There was no need to run new calculations for the repairs. This
would be done right before the launch to determine the time to apogee for proper fusing.
For reference, Table 1 shows the original input data and results that were used for the mortar
design. Figure 13 shows the original pressure profile that was used to determine the thickness
of the three sections of the mortar.

NEW PRESSURE LOGGER
The original catastrophic shell failure produced extreme explosion pressures that destroyed
both pressure loggers. The polycarbonate covers were breached which allowed the heat and
pressure from the blast (and any resulting flame from remaining combustible materials) to
desolder the components on the printed circuit boards (PCB). The excessive pressures burst
the transducers from the inside of the component. The specifications of the transducer indicate
a burst pressure of 10X full scale. This indicates that at the location of the pressure transducers,
the launch shock pressures exceeded 68,947 kPa (10,000 psi). There were no salvageable
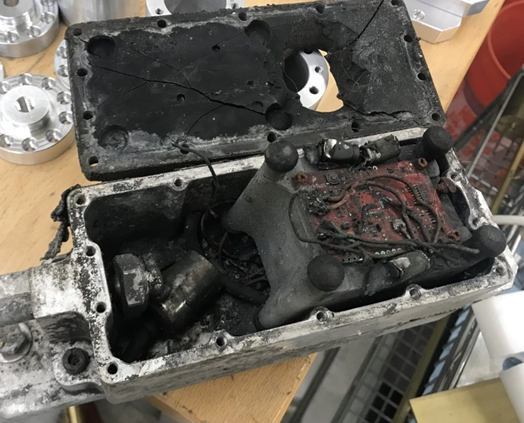
components from the original loggers. Figure 14 shows the remains of one of the data loggers
from the failed attempt.
Functionally, the original logger design worked, so no changes were made to the electronics.
The new logger design used the same off-the-shelf PCB solution along with a high-capacity SD
card6. The same pressure transducer was used that had a range of 0 to 1000 psi7. The pressure
transducer had a Response Time (Voltage/Output) of < 1 ms, an Operating Temperature range
of -40oC to 125oC, and a Gauge Pressure measuring range of 20 to 300 PSIG. No acceleration
sensitivity or compensation data were provided.
The mechanical design was updated incorporating the following changes:
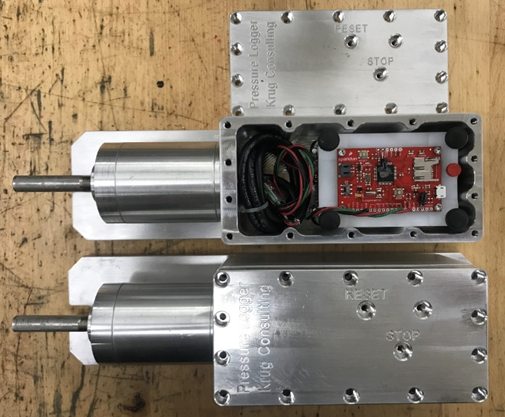
- The polycarbonate cover was replaced with an aluminum cover. If another catastrophic event took place, it is unlikely that the cover would collapse. Small clear screws were inserted in the cover above the PCB LEDs to act as a light pipe so the status of the unit could be verified with the cover in place.
- The pressure transducer was placed in a separate housing so excessive pressure could not migrate to the electronics section.
- A support plate was redesigned to work better with the Unistrut mount.
Figure 15 shows the new pressure loggers. Two were constructed to provide redundancy.
The same calibration equipment was used to gather multiple samples of data while recording
input pressure and recording resulting ADC count. When graphed, the correlation provided an
expected linear correlation that was like the original units. Using line of best fit, the following
formula provides an accurate output pressure (kPa) based on the 10-bit ADC input count.
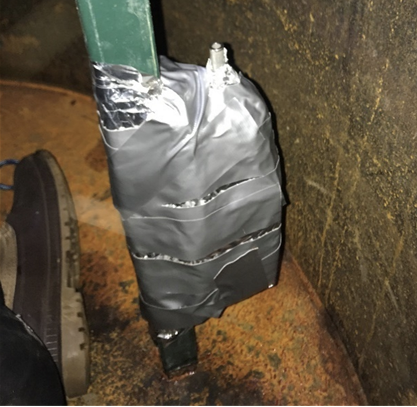
Once installed, the data logger was also wrapped in aluminum foil and duct tape to help protect
the enclosure from the lift flame. Only the small, pressure-sampling tube extended out of the foil.
Figure 16 shows one of the loggers mounted in the mortar before loading the shell.
SHELL LAUNCH
The team gathered in Steamboat on February 6th, 2020. This provided enough time to
thoroughly inspect the shell and finalize construction. The final construction began with the
installation of the internal passfire fusing inside the nukishin tubes. Redundant time fuses were
added to the top of the shell which sealed the shell contents. Passfire fusing was added and
routed to multiple pre-lift ignition cups. The pre-lift cups would transfer flame to the main lift
charge located below. Finally, rising effects were installed on the top of the shell.
We could then perform the final qualifying measurements. Guiness recognizes the total weight
of the projectile and not the diameter. The final shell was measured at 1268 kg (2797 lbs.) which
was higher than expected. The mathematical model was updated based on the final mass and
diameter of the shell to determine time fusing. Table 2 shows the final internal and external
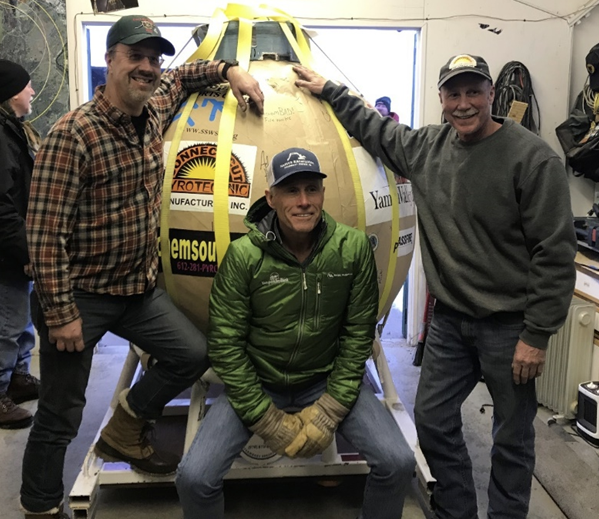
ballistic results that were expected for a successful launch. Figure 17 shows team members in
front of the final shell.

The team was concerned that the original shell was over-lifted which caused fire to enter the
shell. The smaller grain powder added too much surface area to the lift, resulting in a high peak
pressure. The team contacted Goex Powder Inc. and they made a special batch of large
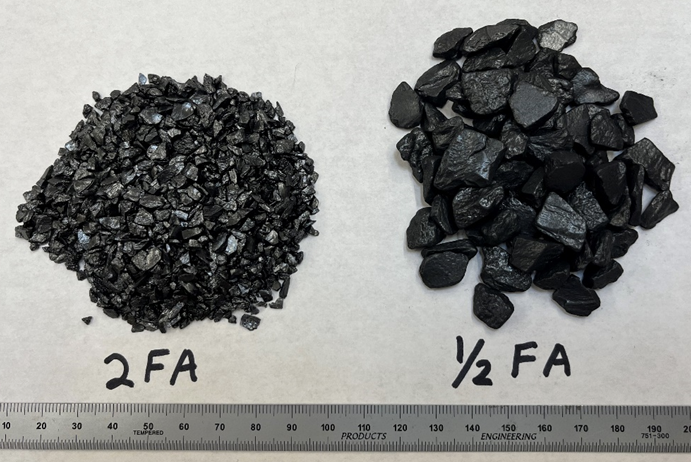
“chunk” black powder that was used in addition to the regular 1FA. They did not have a formal
name for this grain size, so the team referred to it as ½ FA. Since the mortar is so long, it was
necessary for the grains to take longer to burn but would continue to add gas pressure until the
shell exited the mortar.
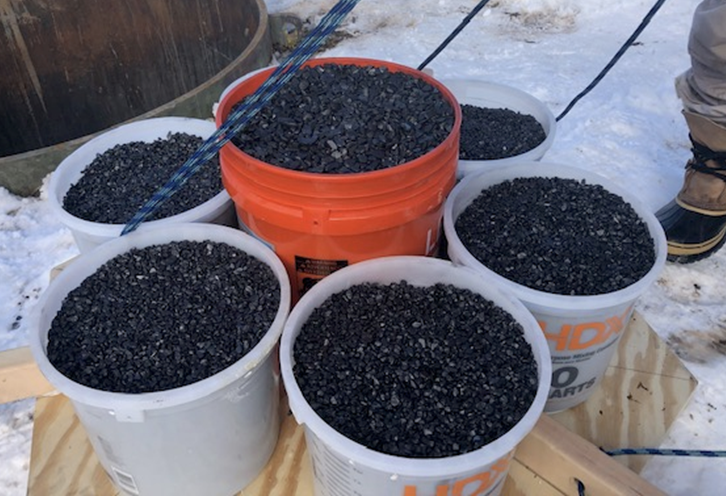
The lift charge consisted of 22.7 kg (50 lbs.) of ½ FA located in the center bucket with the
remaining 45.4 kg (100 lbs.) of 1FA equally distributed in six additional smaller buckets. Figure
18 shows the size difference between 2FA and ½ FA grains.
The team was also concerned about the physical layout of the lift charge in the first attempt. The
first lift pan had a high surface area with a shallow tray. This allowed the flame to propagate to
all grains too quickly. For this attempt, the team used a deep 5-gallon plastic bucket to hold the
½ FA and smaller plastic, paint buckets for the 1FA. Theoretically, this would slow down the
ignition of the grains, slightly reducing the chances of a high-pressure spike. Figure 19 shows
the loading of the lift bucket tray into the mortar prior to loading the shell.
The shell was transported up the mountain and lowered into the mortar using the same process as that of the first attempt. Firing modules were placed, wires were connected, and initial continuity tests were
performed. Cameras were mounted to monitor the launch directly at the mortar. After inspection with the
local Fire Marshall, the modules were turned off to wait for the start of the display.
Both authors traveled to the mortar on a snow mobile about 45 minutes before the launch to arm the
modules, turn on the cameras, and verify the firing system communications. On the way back to the
launch position, they observed that the main fireworks show finale had begun. They had waited too long
to finalize the launch. They quickly sped to the launch position where the rest of the team was ready.
Snow was beginning to fall, and the launch window would soon close.
The system was armed, no aircraft was observed, so the countdown began and fired the shell. There was
some confusion initially since there was so much flame from the lift. Then the rising shell was noted, and
it rose to its apogee. The rising effects burned out and shell was noted to be falling back to the ground.
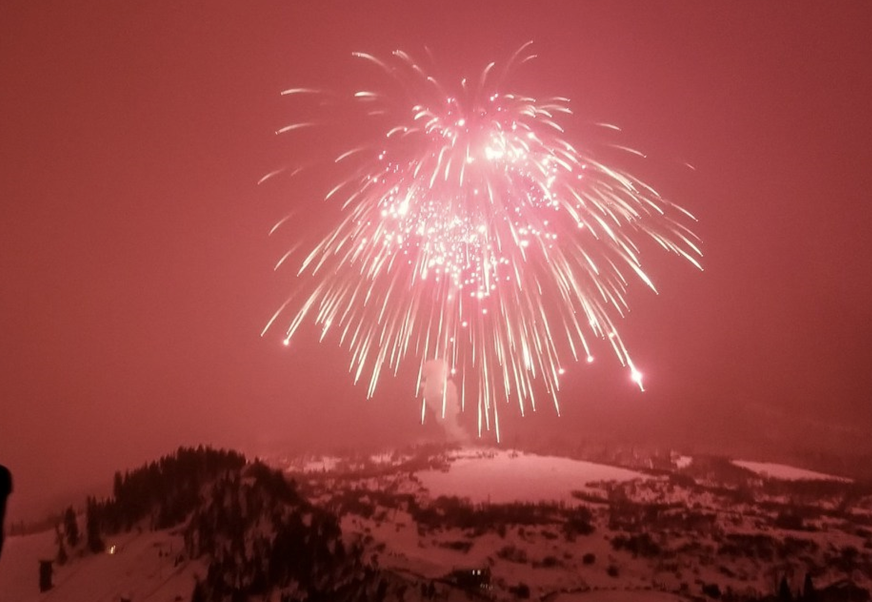
Suddenly, the area illuminated with a bright red glow as the shell burst as expected. This was a big relief
to all team members and participants. Figure 20 shows the burst of the world record shell.
After the initial celebration and interviews, both authors raced back to the mortar for inspection.
The data loggers were recovered but only one seemed to be working. The mortar was covered,
cameras and firing systems were packed up to transport down the mountain. During the
cleanup, the blizzard had begun which made it very difficult to find the bottom of the mountain
with all the confusing trails. The formal celebration began in the ski lodge. Figure 21 shows the
team receiving the Guiness World record certificate from Christina Conlon (Adjudicator
representing Guinness World Records North America, Inc.). At least 100 mm (4 inches) of snow
had fallen by the end of the celebration. The shell was launched just in time.
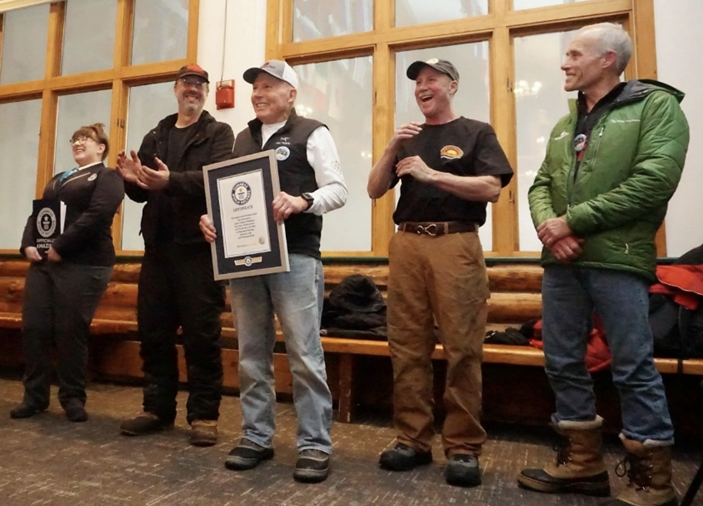
Jim Widmann, and Ed MacArthur
SITE EVALUATION
In May of 2020, the team returned to Steamboat to assess the fallout debris. This was not
possible until all snow had melted. Most of the large debris was within 152 m (500 ft) of the
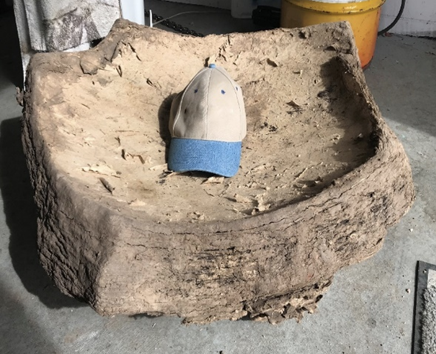
mortar. Figure 22 shows the largest piece of debris that was found within 91 m (300 ft) of the
mortar. This single chunk had a mass of 52 kg (115 lbs.) All other larger chunks were below 13.6
kg (30 lbs.)
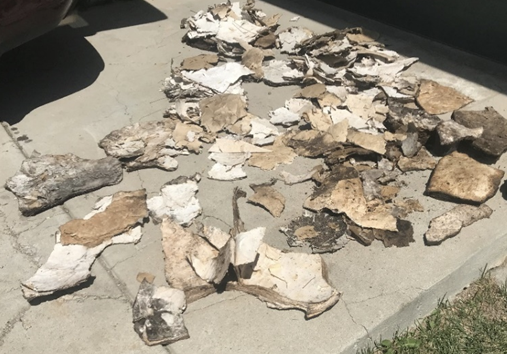
Additional debris was found as far as 518 m (1700 ft) from the mortar but was very lightweight
and would not cause any harm to a human or damage to property. This debris was only in a
single direction and was carried this distance from the prevailing winds on the night of the
launch. Figure 23 shows a sample of this debris.
RESULTING PRESSURE GRAPH
Unfortunately, logger #1 did not record any information. The Unistrut mount was not properly
welded and broke off of the shell stand during the lift. The logger unit slammed against the side
of the mortar and stopped collecting data. It appears that it is still functional but needs to be
tested.
Logger #2 did gather the desired pressure information. This data was compiled in a spreadsheet
that used the calibration data to convert all points to pressure. The pressure points, along with
the shell characteristics, were used in successive calculations to determine the shell
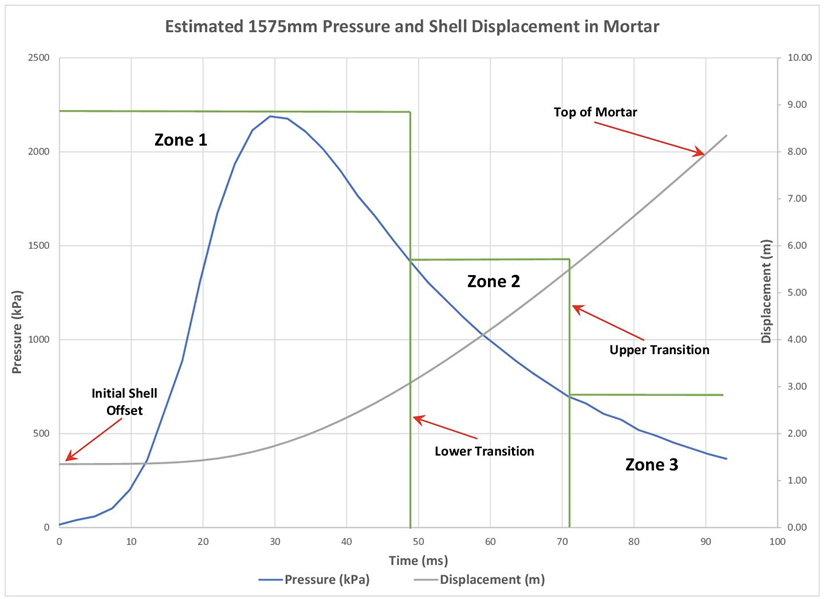
displacement and velocity at multiple points while it traveled up the mortar. Figure 24 shows the
resulting pressure profile along with the calculated shell displacement in the mortar.
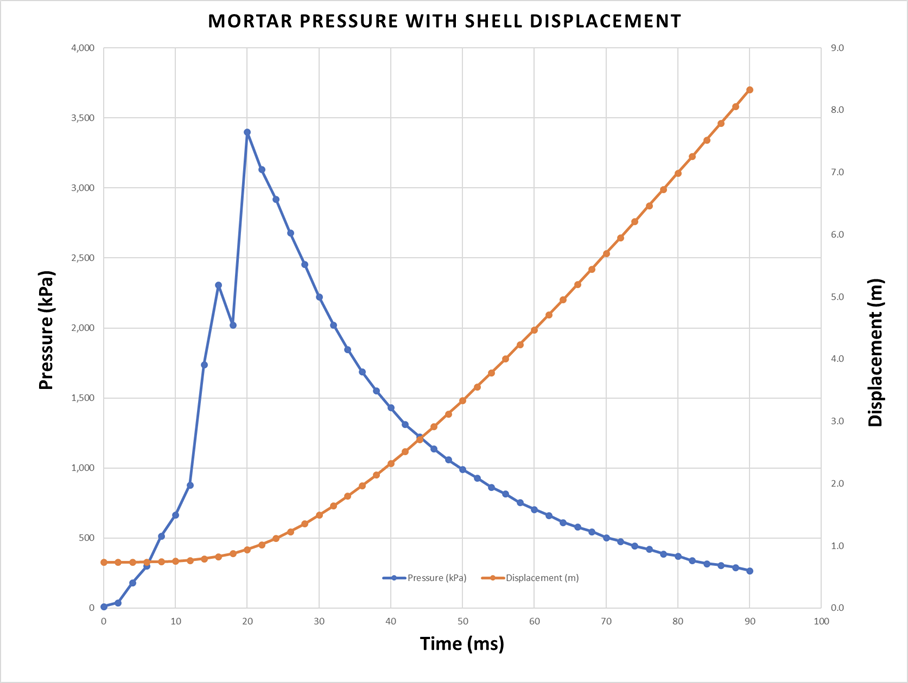
The first observation is the drop in pressure before it reaches the peak. There were multiple
theories on why this could happen, but the answer is very simple. Pressure was rising and
applying force to the bottom of the shell. As the shell started to move, the equator moved past
the top of the liners. The inner diameter changed from 1549 mm (61 inch) to 1575 mm (62 inch)
which increased the side gap and allowed more gases to flow past the shell. This caused a
temporary drop in the pressure under the shell.
Although the data logger was capable of 1-ms sample rate, it was previously found that this rate
was unreliable when storing data. The sample rate was then set to 2 ms which increased
reliability, but may not have adequately represented the peak pressure in the mortar.
COMPARISON OF ESTIMATES TO ACTUAL
A camera was placed close to the mortar facing vertically toward the anticipated burst of the
shell. Video and audio data from the camera were then evaluated to determine the time from
the video frame showing visual shell burst (speed of light) with respect to the frame of the
audio recording of the burst (speed of sound). Based on the current environmental conditions,
the burst altitude was calculated to be 507 m (1665 ft) above the mortar. However, the shell did
not burst at apogee. By evaluating other videos, the shell burst about 19% below apogee. This
would calculate the apogee of the shell at 627 m (2056 ft). Table 3 shows a comparison of
calculated vs. actual shell performance for the shell.

Muzzle velocity, average mortar pressure, and time to apogee are very close between
calculated and measured results. The other parameters do not appear to be very close. During
the development of the mathematical model, it was assumed that the pressure graph could be
stretched out on the time axis. It appears that the increased mass of the shell increased the
pressure under the shell before initial movement. Once the shell began motion, the gases were
able to quickly accelerate the shell out of the mortar. This is only one of the many theories to be
discussed.
Although all the parameters are not the same, the model provides a good starting point when
designing the mortar for larger shells.
CONCLUSION
The successful launch brought an end to the chapter of our team in Steamboat. It was 8 years
of challenging work. The world record was a reasonable goal, but the knowledge and
experience of large shell manufacturing will continue to be used.
There are no immediate plans to continue shell construction in Steamboat. Most of the
chemicals and equipment have been removed since the manufacturing site has been
dismantled. There have been informal discussions on repeating the process to further the
development of large cylindrical shell construction.
The team remains close friends and continue their separate pyro activities. Meanwhile, there
are four very large mortars remaining in place on the mountain above Howelsen hill, waiting for
the next adventure.
ACKNOWLEDGEMENTS
Much appreciation to our other team members, Tim Borden, and Ed MacArthur, who made this
adventure possible and provided resources and equipment for our world record attempt. Thanks
to Robert Brandes and Dan Stegemann for their technical consulting during this research.
Thanks to Ververka Bros. Productions for assistance in the documentation of this adventure.
And finally, thanks to our wives Connie Widmann and Julie Krug for their patience and support
during the last 8 years.
REFERENCES
- Krug, E.M., External and Internal Ballistics Study and Pressure Evaluation for the Safe
Design of a 1,575 mm (62 inch) Mortar, Proceedings of the 17th International Symposium on
Fireworks, Puerto Vallarta, México, 2019 - WASP – Aerial Shell Pasting Machine: Creators of the WASP aerial shell pasting
machines, Connecticut Pyrotecnic Manufacturing. https://www.ctpyro.com/ - Widmann, J.C., 1,200 mm Shells in North America: The Design, Construction, and
Presentation, Proceedings of the 16th International Symposium on Fireworks, Omagari, Japan,
2017 - Mechanical Engineering Reference Manual for the PE Exam 13th Edition, Michael R.
Lindeburg, Professional Publications Inc. 53-4, 53-5. Belmont, CA, USA, 2013 - Marks' Standard Handbook for Mechanical Engineers Tenth Edition, Avallone, E.A., and
Baumeister, T., McGraw Hill Companies, Inc., 1996 - Logmatic v2, part number WIG-12772, (n.d.), Retrieved from SparkFun Electronics,
https://www.sparkfun.com/ [Accessed: 4-24-2015] - Part Number 734-1089-ND, (n.d.), Retrieved from Digi-Key Electronics,
https://www.digikey.com/ [Accessed: 4-15-2015